

Introduction
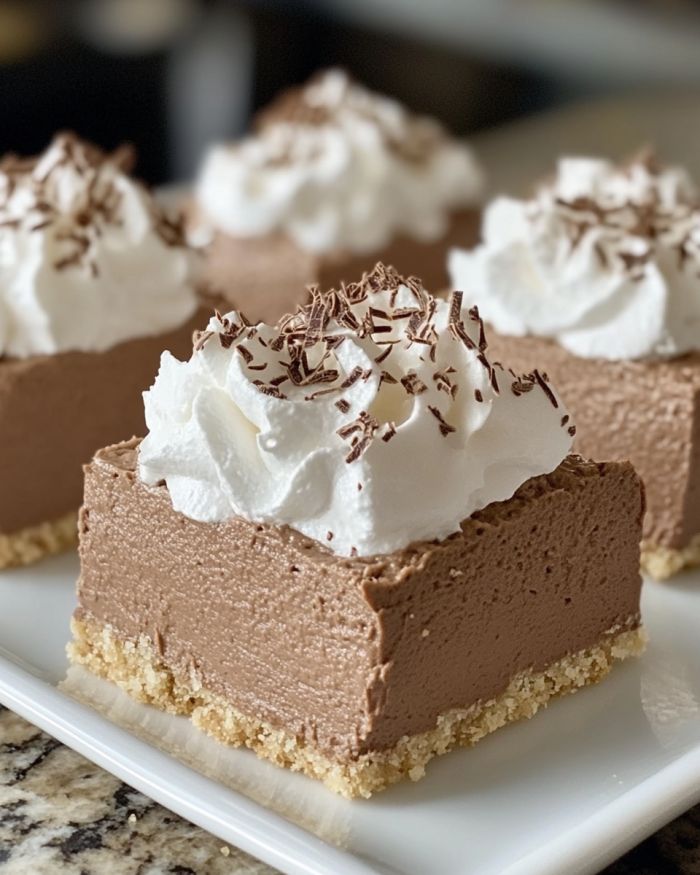
There’s something utterly magical about a dessert that’s both decadent and effortless. Enter the no-bake chocolate mousse bars with whipped cream—a perfect blend of rich, airy chocolate mousse layered over a buttery cookie crust, crowned with a cloud of whipped cream and a sprinkle of chocolate shavings. Whether you’re preparing for a celebration, hosting guests, or just satisfying a chocolate craving, these bars are a no-fuss solution that look gourmet but take minimal effort.
These treats are not only irresistibly smooth and creamy, but they also cater to the modern cook’s desire for quick, oven-free recipes. With no baking required, they are ideal for hot days, small kitchens, or last-minute dessert plans. This guide covers everything you need to know—from ingredients and preparation to tips, storage, and variations—while weaving in proven SEO keywords to ensure your recipe shines online.
Why You’ll Love These No-Bake Chocolate Mousse Bars
1. No Oven, No Hassle
With a straightforward prep and zero baking, this dessert is summer-perfect and beginner-friendly.
2. Creamy & Decadent Texture
The chocolate mousse is fluffy, rich, and melts in your mouth—balanced by a light, buttery crust and airy whipped topping.
3. Perfect for Make-Ahead Entertaining
Prepare in advance, chill, and serve when needed—saving time and stress during parties and holidays.
4. Customizable for Every Taste
Swap crusts, tweak the mousse flavor, or change toppings to create your own signature dessert.
Ingredients for No-Bake Chocolate Mousse Bars with Whipped Cream
Here’s what you’ll need to whip up these showstopping chocolate mousse bars:
For the Crust:
- 1½ cups crushed graham crackers or digestive biscuits
- 6 tablespoons unsalted butter, melted
- 2 tablespoons sugar (optional, depending on biscuit sweetness)
For the Chocolate Mousse:
- 1½ cups heavy whipping cream (chilled)
- 1½ cups semi-sweet or dark chocolate chips
- ½ cup whole milk
- 1 teaspoon vanilla extract
- 1 tablespoon powdered sugar (optional, for extra sweetness)
For the Whipped Cream Topping:
- 1 cup heavy cream (chilled)
- 2 tablespoons powdered sugar
- ½ teaspoon vanilla extract
- Optional: chocolate shavings, cocoa powder, or sprinkles
Step-by-Step Instructions
H2: 1. Make the Crust
H3: How to Prepare a Firm and Flavorful Base
- Crush the biscuits in a food processor or using a zip-top bag and rolling pin until finely ground.
- Mix in the melted butter and sugar until the mixture resembles wet sand.
- Press firmly into the bottom of a parchment-lined 8×8 or 9×9-inch pan using a flat-bottomed glass or measuring cup.
- Place the crust in the freezer for 15–20 minutes to set while preparing the mousse.
H2: 2. Prepare the Chocolate Mousse
H3: The Creamy Centerpiece of the Bars
- Heat the milk gently in a saucepan until warm but not boiling. Remove from heat.
- Add the chocolate chips to the warm milk, let sit for 1 minute, then stir until completely melted and smooth.
- Stir in the vanilla extract and let the mixture cool to room temperature.
- In a separate bowl, whip the cream (1½ cups) to soft peaks. Add optional powdered sugar to sweeten.
- Once the chocolate is cooled, gently fold in the whipped cream in batches using a spatula. Don’t overmix.
- Spread the mousse evenly over the chilled crust. Smooth the top with a spatula.
H2: 3. Chill to Set
Let the assembled bars chill in the refrigerator for at least 4 hours or preferably overnight. This allows the mousse to set firmly and the flavors to meld beautifully.
H2: 4. Add the Whipped Cream Topping
H3: Light and Airy Final Touch
- Whip the remaining 1 cup of heavy cream with powdered sugar and vanilla until soft peaks form.
- Spread or pipe the whipped cream over the chilled mousse layer.
- Garnish with chocolate shavings, cocoa powder, or even fresh berries.
Nutrition Information (Per Serving)
| Nutrient | Amount |
|---|---|
| Calories | 320–380 |
| Carbs | 24g |
| Protein | 3–5g |
| Fat | 25g |
| Sugar | 16g |
Note: Values will vary depending on brands and ingredient quantities used.
Storage and Make-Ahead Tips
Refrigeration
- Store in an airtight container for up to 5 days.
- Best served cold, directly from the fridge.
Freezing
- Can be frozen for up to 2 months.
- Freeze without the whipped topping for best results.
- Thaw overnight in the fridge and add whipped cream before serving.
Delicious Variations to Try
Crust Alternatives
- Oreo Crust: Substitute with crushed Oreos and reduce added sugar.
- Pretzel Crust: Adds a salty contrast to the sweetness.
- Almond Flour Base: For a low-carb, gluten-free version.
Mousse Flavor Variations
- White Chocolate Mousse
- Mint Chocolate Chip Mousse
- Mocha Espresso Mousse
- Peanut Butter Chocolate Swirl
Creative Toppings
- Toasted coconut flakes
- Crushed candy bars (e.g., Twix, Snickers)
- Seasonal fruits like raspberries or strawberries
Popularity & Trends: Why Everyone’s Loving This Recipe
According to Google Trends, the search term “no-bake desserts” spikes every summer, while “chocolate mousse recipes” see increased interest during holidays like Valentine’s Day and Thanksgiving.
On platforms like Pinterest and TikTok, quick, chilled desserts that don’t require baking, especially ones that are photogenic, are among the most shared content. The hashtags #nobakedessert, #chocolatemousse, and #easyrecipes collectively boast over 500 million views across platforms.
FAQs About No-Bake Chocolate Mousse Bars
Q1: Can I use store-bought whipped cream?
Yes, but homemade whipped cream provides better texture and flavor without added stabilizers.
Q2: Is it okay to use milk chocolate instead of dark?
Absolutely! Adjust the sweetness accordingly, especially if you’re adding extra sugar to the mousse.
Q3: Can I make this dessert vegan?
Yes! Use coconut cream, dairy-free chocolate, and plant-based whipped topping to adapt it to vegan diets.
Q4: Can I double the recipe?
Certainly—just use a 9×13-inch pan and slightly increase chilling time to ensure it sets evenly.
How to Serve for Maximum Impact
- Cut into squares or rectangles using a hot knife for clean edges.
- Serve on chilled plates to prevent melting.
- Drizzle with chocolate sauce or caramel for extra indulgence.
- Pair with coffee or dessert wine for a grown-up twist.
Final Thoughts
No-bake chocolate mousse bars with whipped cream are proof that you don’t need complicated techniques or baking skills to make an unforgettable dessert. With their melt-in-your-mouth texture, luxurious flavor, and impressive presentation, they check all the boxes for the perfect treat.
Whether you’re a seasoned baker or just stepping into the kitchen, these mousse bars are a fail-proof way to wow your guests and satisfy your chocolate cravings. Plus, with endless customization options, this is one dessert you’ll want to return to again and again.